



- View
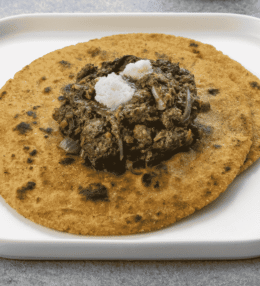
Makki ki roti is a Punjabi maize flatbread with a gently sweet, earthy flavour and a tender, slightly grainy crumb. Cooked on a tawa until golden in places, it is particularly good with mustard greens and a little butter. The dough needs careful handling, particularly when transferring it to the pan.
This Pakistani version makes eight small rotis, enough for four people alongside saag or another main dish. It uses maize flour alone, with hot water to help the dough come together. Allow about an hour and twenty minutes when cooking the batch one roti at a time.
What Is Makki Ki Roti?
Makki ki roti is a Punjabi flatbread made from maize flour, water and salt, without yeast or baking powder. It is also called makki di roti in Punjabi. The dough is shaped into rounds and cooked on a flat pan, giving the outside toasted patches while the middle remains tender.
Maize flour does not form the stretchy dough you get from wheat atta. It needs to be pressed and supported rather than stretched into a thin sheet. A slightly uneven edge is perfectly acceptable; what matters is an even thickness so the centre and edges cook together.
Serve it fresh with Sarson Ka Saag. The maize flavour complements the peppery greens, while ghee or butter adds richness. Makki ki roti is firmer and more delicate than a wheat chapati, so expect a different texture rather than the same soft fold.
Ingredients and Taste
The flavour comes mainly from the maize itself. Yellow makki ka atta gives the bread its familiar golden colour, with a sweetness that becomes more noticeable as the surface toasts. A little salt keeps the flavour savoury without overpowering the grain.
Hot water helps the flour come together into a workable dough. The amount needed varies with the grind and freshness of the flour, so the dough’s feel matters more than pouring in every drop. It should be soft enough to pat out, with no deep cracks or wet, paste like surface.
Ghee is used sparingly during cooking and again after the roti leaves the pan. It adds a buttery aroma and helps the warm bread stay pleasant to eat. The plain version needs no spices, although a little ajwain can add a herbal, thyme like note.
A Taste of History
Makki ki roti belongs to Punjab’s shared cooking traditions, including those of Pakistani Punjab. Its pairing with sarson ka saag is associated with winter meals, when mustard greens are available. The bread and greens are often served with butter, making a meal from a small set of familiar ingredients.
Hand patting is a traditional way of shaping the dough. Home cooks also use a rolling pin or press the dough between sheets to make it easier to handle. A tawa allows the bread to cook on an ordinary hob, without a tandoor or special bread oven.
Which Flour Should You Buy?
Look for finely ground maize flour labelled makki ka atta or makai atta at a South Asian grocer. Avoid coarse polenta for this recipe, as larger particles make the dough harder to shape and can leave the bread gritty. Fine maize flour is the starting point for the water quantities below.
UK cornflour is usually corn starch, the fine white powder used to thicken sauces. It is not the flour needed here. Jowar flour is sorghum, another different grain. Read the ingredient label rather than relying only on a packet’s colour or a general reference to corn flour.
How Do You Stop the Dough Cracking?
Start with hot water, then let the mixture cool until comfortable to knead. Work it until it holds together smoothly. If a flattened portion develops deep splits around the edge, knead a little warm water into that portion before trying again.
Keep the remaining dough covered while you shape and cook each roti. A lightly damp cloth prevents the surface drying out. Small cracks can be pressed together with damp fingertips, but a round that repeatedly falls apart needs its dough adjusted rather than more force from the rolling pin.
How to Make Makki Ki Roti
Mix the maize flour with salt and hot water, knead once comfortable to handle, then pat the dough into small rounds. Cook each roti on a preheated tawa and serve warm. See the recipe card at the bottom for exact ingredient quantities and printable cooking instructions.
Ingredients
Fine maize flour: Use makki ka atta rather than corn starch or coarse cornmeal. A small reserve of the same flour is useful if the dough becomes too sticky.
Water: Hot water starts the dough, with extra warm water added only if needed. Use comfortably warm water for dampening your hands during shaping.
Salt: Fine salt seasons the dough evenly.
Ghee: Used for cooking and brushing the finished rotis. Neutral oil can replace it for a version without dairy.
Optional ajwain: Carom seeds add an aromatic flavour. They can be left out for a plain roti.
Optional accompaniments: Sarson ka saag, butter, sliced onion and pickle can be served separately.
Equipment
Use a heatproof mixing bowl, a sturdy spoon, a clean damp cloth and a heavy tawa or frying pan about 24 cm across. Two sheets of baking parchment help with shaping, and a broad spatula supports the roti when turning it. A rolling pin is optional because the dough can be flattened by hand.
Cooking Instructions
Step 1: Mix with Hot Water
Combine the maize flour, salt and optional ajwain in the bowl. Pour in the starting amount of just boiled water and stir thoroughly with a spoon. Cover and leave for about ten minutes, or until the mixture is comfortable to handle.
Step 2: Knead and Adjust
Knead for about five minutes until the dough holds together and feels pliable. Add warm water gradually if it crumbles, or a little reserved maize flour if it is sticky. Divide into eight portions and cover them with a lightly damp cloth.
Step 3: Pat Out a Roti
Shape one portion into a smooth ball and place it between parchment sheets. Press gently from the centre towards the edges to make a small round of even thickness. Repair minor cracks with damp fingertips and keep the edges from becoming much thinner than the middle.
Step 4: Transfer to the Tawa
Preheat the pan over a medium heat for several minutes. Peel off the upper sheet, invert the dough onto your open palm or a broad spatula, and remove the remaining sheet. Gently lay the roti on the pan without touching the hot surface. Keep the parchment off the heat.
Step 5: Cook Both Sides
Cook until the first side sets and develops a few light golden patches, then turn carefully. Cook the second side, add a little of the cooking ghee and turn again as needed. Allow about four to six minutes in total, pressing the edges gently with the spatula to help them cook.
Step 6: Finish and Repeat
The roti should have golden patches on both sides and no wet dough in the centre. Brush with a little finishing ghee, wrap in a clean cloth and repeat with the remaining dough. Shape the next roti while one cooks if you are comfortable managing both tasks.
Variations and Substitutions
For a vegan version, use neutral oil in place of ghee and omit any serving butter. The maize flavour becomes more prominent without the buttery finish. Keep the dough itself the same rather than adding another binder.
Ajwain is an optional flavouring rather than an essential ingredient. Leave it out for a plain version, especially when serving a strongly seasoned main dish. This basic recipe also works without an extra pat of butter at the table.
Some cooks add wheat atta to make the dough easier to handle. That changes the texture and introduces gluten. The recipe below stays with maize flour alone, using small rounds and supported shaping to make transfer manageable.
Cooking Tips for Makki Ki Roti
Keep the rounds evenly thick and avoid rolling them as thin as chapatis. An overly thin edge may dry before the middle is cooked, while a thick centre can remain doughy. Start with small rotis before attempting a larger diameter.
Use the first roti to judge the pan. If it blackens quickly while still wet inside, reduce the heat. If it takes a long time to colour and becomes dry, raise the heat slightly. A heavy pan helps keep the heat steadier between batches.
Do not turn the roti before the underside has set, as it can tear. Slide the spatula well underneath and support the centre as you flip. It may puff in patches, but full inflation is not required for a cooked roti.
If the dough sticks to the parchment, peel the paper back slowly rather than pulling the roti away from it. A light dusting of reserved maize flour can help, but too much dry flour makes the surface harder to bind. Adjust a wet dough before shaping the next portion.
How to Store and Reheat Makki Ki Roti
Storing
Makki ki roti is best freshly cooked. Keep a serving batch wrapped in a clean cloth while finishing the remaining rotis. For leftovers, allow them to cool, then pack airtight and refrigerate within two hours. Use within 48 hours; refrigeration will make them firmer.
Freezing
Freeze cooled rotis with baking parchment between them, sealed in a freezer bag or container. Aim to use within two months for good quality. The separators allow you to remove individual rotis without breaking the whole stack apart.
Defrosting
Defrost the required rotis in the fridge, keeping them covered so the edges do not dry out. Use within 24 hours of fully thawing. Handle gently while cold, as the breads can be more fragile than they were straight from the pan.
Reheating
Lightly moisten a roti and warm it in a covered frying pan over a medium to low heat, turning as needed, until steaming hot through the centre. Uncover briefly if the surface is too damp. Reheat only the amount you need, and reheat each portion once.

Pakistani Makki Ki Roti (Maize Flatbread)
Ingredients
Dough
- 300 g fine maize flour makki ka atta, not corn starch or coarse polenta
- ½ teaspoon fine salt about 3 g
- 300 ml just boiled water for the initial mix
- Up to 60 ml additional warm water for adjusting the dough used gradually as needed
- ½ teaspoon ajwain carom seeds, optional
Shaping and Cooking
- Up to 20 g extra fine maize flour reserved for correcting sticky dough or light dusting, only if needed
- 40 g ghee divided: 20 g for cooking and 20 g for brushing the cooked rotis
- A little comfortably warm water for dampening hands and sealing small cracks
Optional Serving Accompaniments
- Butter sliced onion or pickle, as desired
Instructions
- Put the 300 g maize flour, salt and optional ajwain in a heatproof bowl. Add the 300 ml just boiled water and mix thoroughly with a sturdy spoon. Cover and leave for about 10 minutes, until comfortable to handle. Wait longer if it is still too hot to knead.
- Knead for about 5 minutes until the dough is smooth enough to form a ball and pliable enough to flatten. If dry or crumbly, knead in the additional warm water a teaspoon at a time. If sticky, add the reserved flour a teaspoon at a time. Use only what the dough needs. Divide into 8 equal portions and keep covered with a lightly damp cloth.
- Smooth one dough portion between lightly dampened palms. Put it between two parchment sheets and pat from the centre outwards into a round about 13 cm across and 4 to 5 mm thick. Use gentle pressure; do not stretch it. Seal small edge cracks with damp fingertips. If it splits deeply, knead a little warm water into that portion and reshape.
- Preheat the heavy tawa or frying pan over a medium heat for about 3 to 5 minutes, following any limits for your pan. Peel away the top parchment sheet, invert the roti onto an open palm or broad spatula, then peel away the second sheet. Gently lay the roti on the hot pan, keeping hands clear of the metal. Remove both sheets before cooking; they are for shaping only.
- Cook the first side for about 1 to 2 minutes, until set underneath with a few light golden patches. Turn using the broad spatula and cook the second side for about 2 minutes. Use roughly one eighth of the 20 g cooking ghee for this roti, brushing it thinly over the surfaces as you turn it again. Cook for another 1 to 2 minutes as needed, pressing gently around the edges. Both sides should have golden patches and the centre should be set, without wet dough. Check the first roti by breaking it open; lower the heat and cook longer if browned outside but doughy inside. Total cooking is about 4 to 6 minutes per roti.
- Brush each cooked roti with one eighth of the remaining 20 g ghee. Wrap in a clean cloth while cooking the rest. Shape the next round during cooking if comfortable doing so, keeping the unused dough covered. Serve warm, ideally as the rotis are ready, with the optional accompaniments.
Nutrition
Recipe Notes
Water: The starting 300 ml is a measured starting point, not a guarantee of exact absorption. Expect to use some of the additional 60 ml with many flours, but add it gradually. The dough should pat out easily without deep cracks and should not smear like a wet paste. Particularly coarse flour is unsuitable for this schedule rather than a reason to keep adding water indefinitely.
Size and yield: The batch makes 8 small rotis with 37.5 g maize flour in each before any reserved flour is used. Diameter and thickness are approximate because the final dough weight depends on water uptake. Aim for even thickness; avoid stretching a portion to meet the diameter.
Timing: The total is 25 minutes preparation, 10 minutes hydration and cooling, and a 45 minute cooking allowance. Eight rotis at about 5 minutes each plus pan preheating fit this estimate. Allow roughly 40 to 55 minutes for the cooking stage depending on thickness and hob heat. Shape later rotis during cooking; shaping every roti separately before starting, or cooking unusually thick ones, may extend the total.
Vegan option: Replace the 40 g ghee with 40 ml neutral oil, divided equally between cooking and brushing. Omit serving butter. Keep the maize flour, salt and water unchanged.
Wheat: This card contains no wheat flour. Adding atta makes a different dough and introduces gluten; no wheat conversion is included. For someone avoiding gluten, check the maize flour and other ingredients for cross contamination and use suitable equipment. Ghee and butter contain milk.
Storage: Cool leftover rotis and refrigerate airtight within 2 hours. Keep the fridge at 5°C or below and use within 48 hours. Freeze promptly after cooling, separated with parchment; use within 2 months for quality. Defrost covered in the fridge and use within 24 hours. Lightly moisten and reheat in a covered pan, turning until steaming hot throughout. Reheat each portion only once.
Leave a Review