
- View
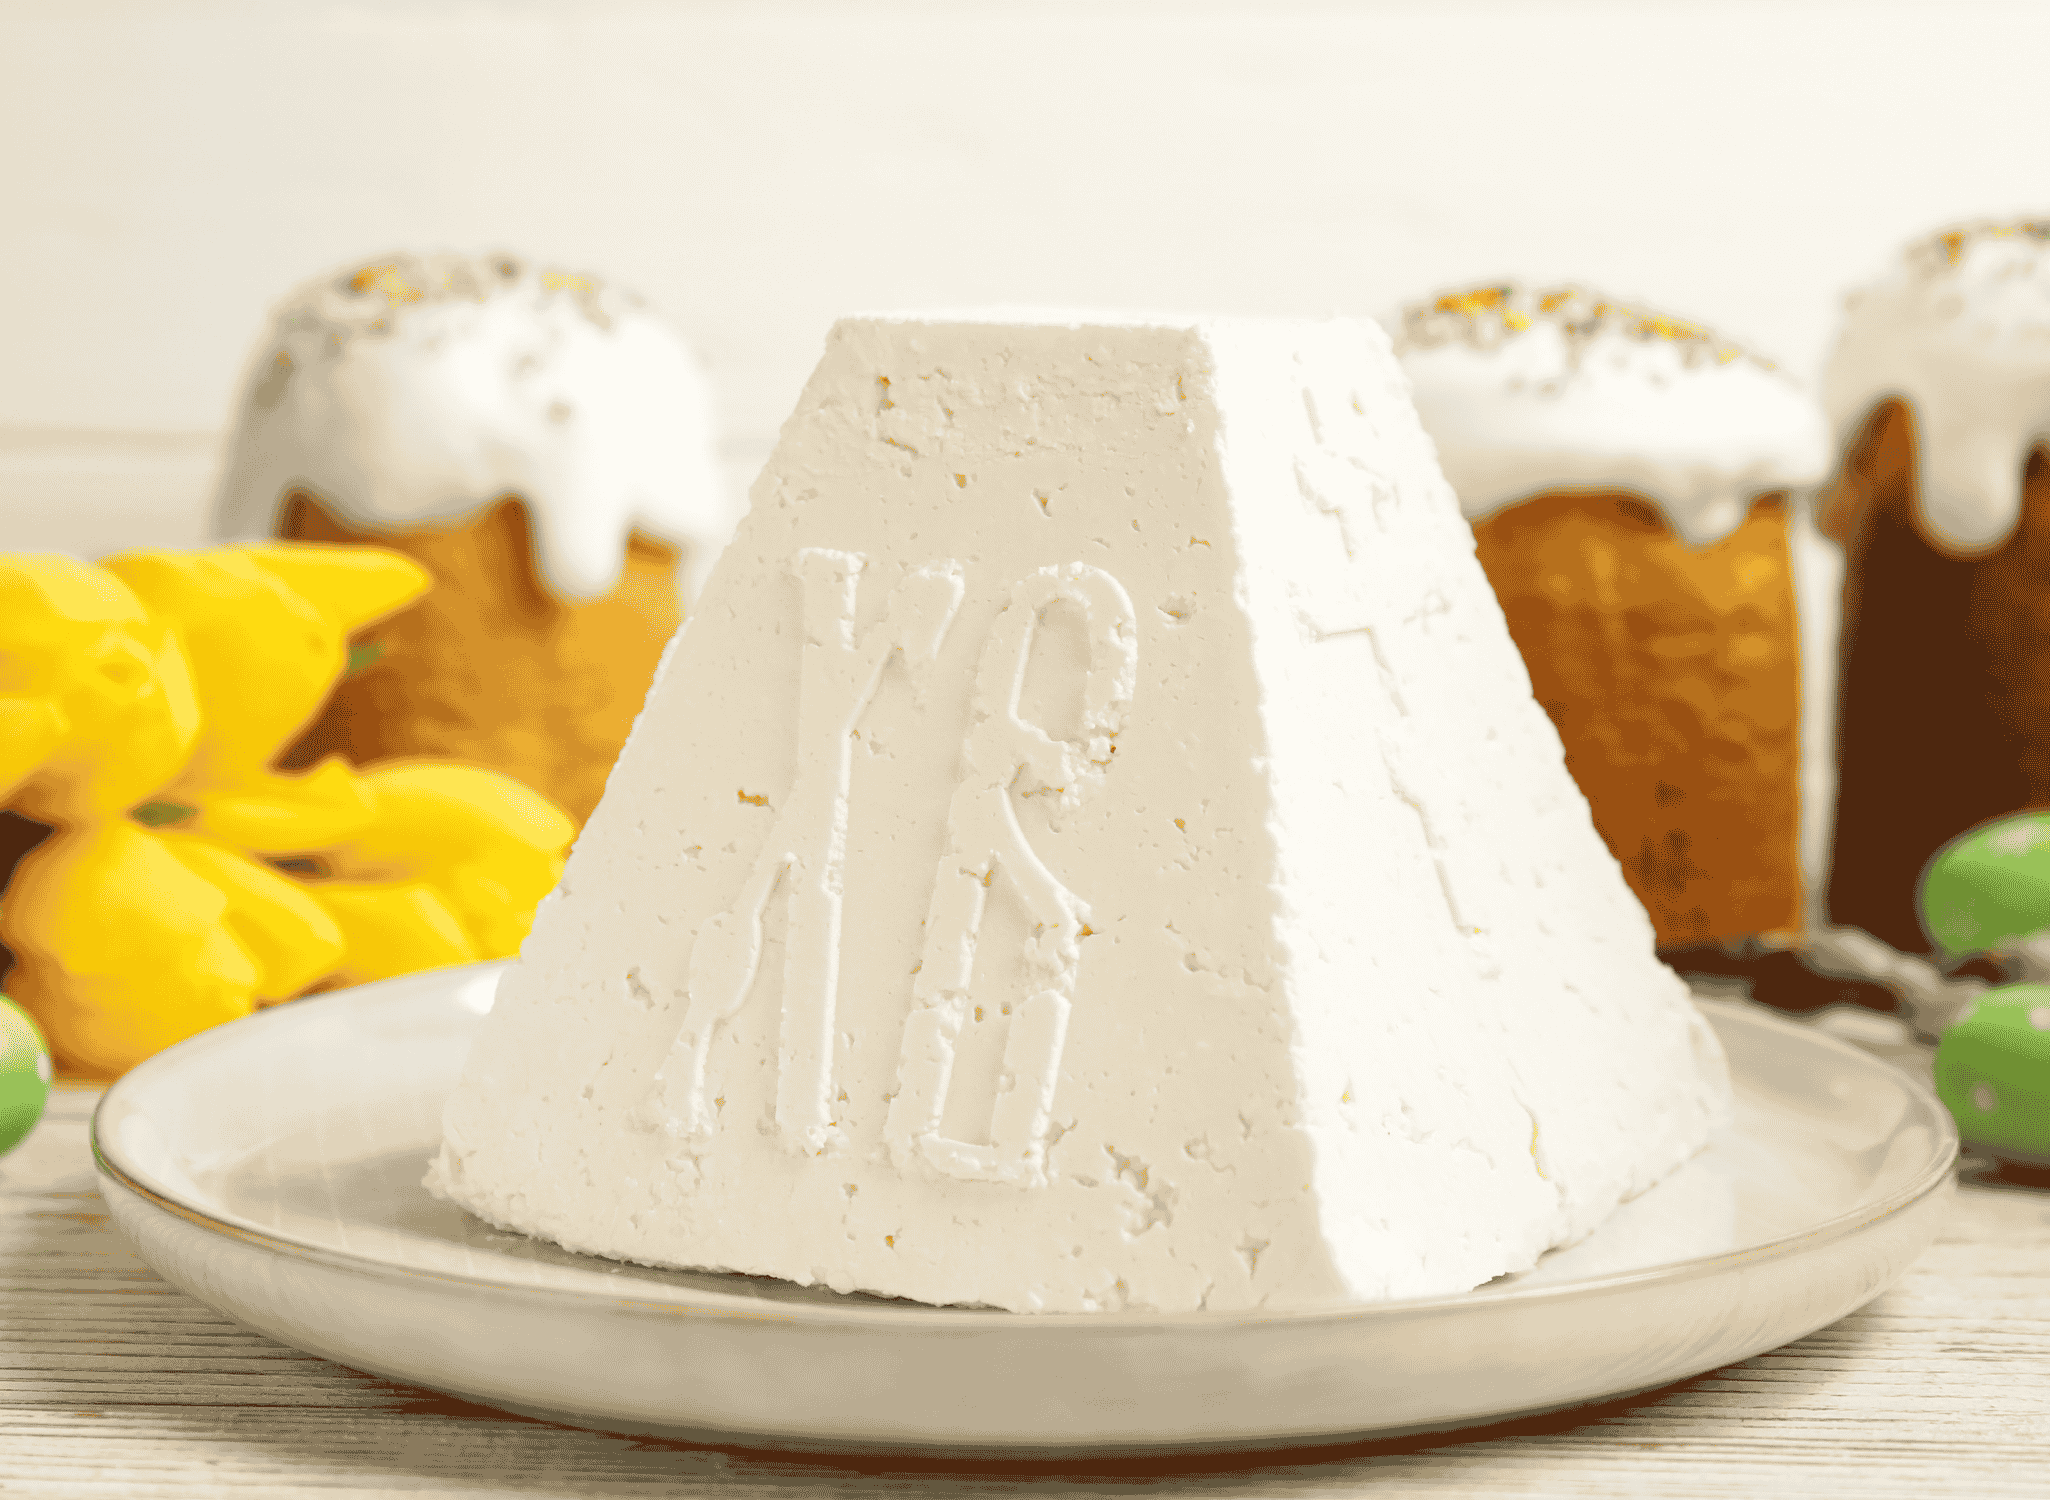
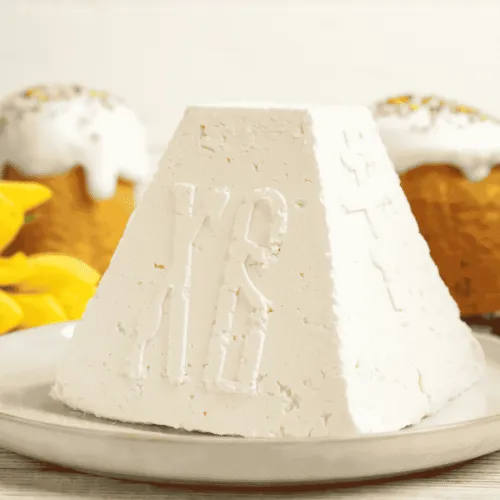
Paskha is a dish closely tied to Russian Orthodox Easter, a time of joy, colour, and careful tradition. Made from sweetened cheese and moulded into a distinctive pyramid shape, it appears only once a year and is never rushed.
This creamy dessert is often decorated with religious symbols and dried fruit, sitting at the centre of a festive table. Its appearance signals the end of Lent and the arrival of celebration, both spiritual and culinary.
What makes Paskha special is not just its rich texture, but also its purpose. It is more than dessert. It is a marker of season and belief, shaped by both hands and heritage, enjoyed in moments of family gathering.
Want to dive deeper into Russian Cuisine? Don’t miss our post on 30 Traditional Russian Foods to Try
What Is Paskha?
Paskha is a no-bake dessert traditionally made from tvorog, a type of fresh farmer’s cheese. The mixture is combined with ingredients like butter, eggs, sugar, and sour cream, then pressed into a mould and chilled until set.
Once firm, the dessert is turned out onto a plate and often decorated with candied peel, almonds, or raisins. The mould is usually pyramid shaped, representing the Church or the tomb of Christ, depending on the tradition followed.
You will often see the letters XB on the sides of Paskha, standing for Khristos Voskrese or Christ is Risen. These details turn it from a simple dish into a symbol of celebration and deep religious meaning.
Ingredients and Taste
The key ingredient is tvorog, a lightly tangy curd cheese similar to quark or ricotta. It is mixed with softened butter and sweetened with sugar. Egg yolks or sour cream may be added for richness, along with a splash of vanilla.
Some families include raisins, dried apricots, or candied fruits, while others prefer chopped almonds or lemon zest. The dessert is often set in a cloth lined wooden or plastic mould that allows excess moisture to drain.
The flavour is gentle and creamy, with a balance of sweetness and tang from the cheese. Its dense texture holds its shape while melting smoothly on the tongue. Each spoonful feels luxurious without being overly heavy.
A Taste of History
Paskha originates from the Russian Orthodox Easter tradition, where food takes on powerful symbolic roles. For forty days of Lent, dairy, eggs, and meat are avoided. When Easter comes, dishes like Paskha mark their return.
The dish was historically made in rural kitchens, where fresh tvorog was easy to prepare. It was shaped using wooden moulds passed down through generations, often carved with religious letters or crosses.
Though it is linked to Russian Easter, variations of Paskha appear in Ukraine, Belarus, and parts of the Baltics. While ingredients may differ slightly, the heart of the dish remains the same: a rich, cold dessert tied to resurrection and joy.
Today, Paskha is often homemade, though modern versions may use cream cheese or blenders instead of cheesecloth and wooden presses. Still, the spirit of the dish stays intact. It is about sharing, remembering, and celebrating something deeper.
How to make Paskha (Sweet Cheese Dessert)
Paskha is a traditional Russian Easter dessert made from fresh curd cheese, butter, sugar, and dried fruits, often shaped in a mould to symbolise rebirth. Expect a rich, creamy texture and aromatic sweetness with subtle hints of vanilla and citrus. Patience in straining and chilling is key to achieving its signature density and flavour. See the recipe card at the bottom for printable directions
Ingredients
For the base
- 500g tvorog (Russian farmer’s cheese or well drained cottage cheese)
- 100g unsalted butter, softened
- 120g caster sugar
- 100ml sour cream
- 2 egg yolks
- 1 tsp vanilla extract
- Zest of 1 lemon
- 80g raisins or candied fruits (finely chopped)
- 2 tbsp chopped almonds (optional)
- Pinch of salt
Cooking Instructions
Step 1: Drain the cheese
To begin, place the tvorog in a fine mesh sieve or cheesecloth over a bowl and allow it to drain in the fridge for at least 4 hours or overnight. This removes excess moisture and ensures a firm, creamy result. Move on to preparing the custard base.
Step 2: Prepare the egg custard
In a small saucepan, whisk the egg yolks with sugar, salt, and sour cream. Place over low heat and stir continuously until thickened slightly (do not boil). Remove from heat and let it cool completely. Transition to creaming the butter.
Step 3: Cream the butter
In a large mixing bowl, beat the softened butter until light and fluffy. This step adds volume and smoothness to the Paskha base. Proceed to add the drained cheese.
Step 4: Combine cheese and butter
Pass the drained tvorog through a fine sieve or food processor until smooth. Add it gradually to the whipped butter, mixing until fully incorporated. Then fold in the cooled custard mixture. Prepare for flavouring.
Step 5: Add flavourings and mix-ins
Add the vanilla extract, lemon zest, raisins or candied fruits, and almonds (if using). Mix until evenly distributed. The mixture should be creamy but not runny. Transition to mould preparation.
Step 6: Line the mould
Line a traditional wooden paskha mould or a fine sieve with clean, damp cheesecloth, leaving enough overhang to fold over the top. Ensure the lining is snug to maintain the dessert’s shape. Continue to fill the mould.
Step 7: Fill the mould
Spoon the Paskha mixture into the mould, pressing gently to remove air pockets. Smooth the surface, then fold the cheesecloth over the top. Place a small weight on top to help the dessert set. Transfer to chilling.
Step 8: Chill overnight
Set the mould in a dish or bowl to catch any liquid, and refrigerate for at least 12 hours. The long chilling time allows the flavours to develop and the structure to firm up. Prepare to unmould the Paskha.
Step 9: Unmould the Paskha
Carefully unfold the cheesecloth and invert the mould onto a serving plate. Gently peel off the cloth. If the dessert doesn’t release immediately, let it sit for a few minutes at room temperature before trying again.
Final step: Serve and garnish
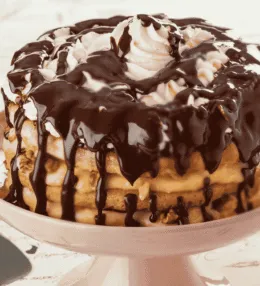
Serve chilled, garnished with extra candied fruit, flaked almonds, or fresh berries. For a traditional touch, place it at the centre of the Easter table. Best enjoyed in thin slices with tea or sweet bread.
Variations and substitutions
- If tvorog is unavailable, use well drained ricotta or full fat farmer’s cheese.
- Orange zest can replace lemon for a different citrus profile.
- Swap raisins for dried apricots or cherries for added colour.
Cooking Tips for Perfect Paskha
- Always use full fat cheese and sour cream for best texture.
- Stir the custard gently and never let it boil to avoid curdling.
- Press the mixture into the mould firmly to prevent air pockets.
- Chill for at least 12 hours to ensure it sets properly and slices cleanly.
Russian Paskha (Sweet Cheese Dessert)
Ingredients
For the base
- 500 g tvorog Russian farmer’s cheese or well drained cottage cheese
- 100 g unsalted butter softened
- 120 g caster sugar
- 100 ml sour cream
- 2 egg yolks
- 1 tsp vanilla extract
- Zest of 1 lemon
- 80 g raisins or candied fruits finely chopped
- 2 tbsp chopped almonds optional
- Pinch of salt
Instructions
- To begin, place the tvorog in a fine mesh sieve or cheesecloth over a bowl and allow it to drain in the fridge for at least 4 hours or overnight. This removes excess moisture and ensures a firm, creamy result. Move on to preparing the custard base.
- In a small saucepan, whisk the egg yolks with sugar, salt, and sour cream. Place over low heat and stir continuously until thickened slightly (do not boil). Remove from heat and let it cool completely. Transition to creaming the butter.
- In a large mixing bowl, beat the softened butter until light and fluffy. This step adds volume and smoothness to the Paskha base. Proceed to add the drained cheese.
- Pass the drained tvorog through a fine sieve or food processor until smooth. Add it gradually to the whipped butter, mixing until fully incorporated. Then fold in the cooled custard mixture. Prepare for flavouring.
- Add the vanilla extract, lemon zest, raisins or candied fruits, and almonds (if using). Mix until evenly distributed. The mixture should be creamy but not runny. Transition to mould preparation.
- Line a traditional wooden paskha mould or a fine sieve with clean, damp cheesecloth, leaving enough overhang to fold over the top. Ensure the lining is snug to maintain the dessert’s shape. Continue to fill the mould.
- Spoon the Paskha mixture into the mould, pressing gently to remove air pockets. Smooth the surface, then fold the cheesecloth over the top. Place a small weight on top to help the dessert set. Transfer to chilling.
- Set the mould in a dish or bowl to catch any liquid, and refrigerate for at least 12 hours. The long chilling time allows the flavours to develop and the structure to firm up. Prepare to unmould the Paskha.
- Carefully unfold the cheesecloth and invert the mould onto a serving plate. Gently peel off the cloth. If the dessert doesn’t release immediately, let it sit for a few minutes at room temperature before trying again.
- Serve chilled, garnished with extra candied fruit, flaked almonds, or fresh berries. For a traditional touch, place it at the centre of the Easter table. Best enjoyed in thin slices with tea or sweet bread.


Leave a Review